Color Correction after Scanning
April 22, 2000
I recently scanned about 90 old slides.
Many of the Ektachrome slides had become reddish with age.
The techniques I used to regain more accurate colors is described here.
Color Correction in the HP S20 Scanning Software
 I set the Photo Type to Faded or old color slide.
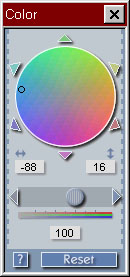
This apparently frees the HP Color wheel to remove the overall reddish tint.
I often drag the little black circle around a little and watch the result
in the preview.
Note the numbers -88 and 16 in the image at the right.
After correcting one set of slides in the same roll,
one of them looked better than the others.
I copied down the 2 numbers for that slide and then rescanned 1 or 2 of others,
using those numbers.
The results were better the second time.
I set the Photo Type to Faded or old color slide.
This apparently frees the HP Color wheel to remove the overall reddish tint.
I often drag the little black circle around a little and watch the result
in the preview.
Note the numbers -88 and 16 in the image at the right.
After correcting one set of slides in the same roll,
one of them looked better than the others.
I copied down the 2 numbers for that slide and then rescanned 1 or 2 of others,
using those numbers.
The results were better the second time.
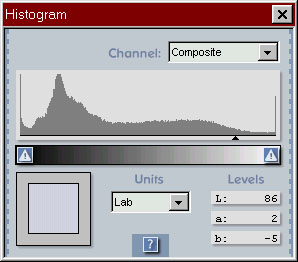
If the image has a large white area, the histogram tool with Lab units is useful.
I put the cursor of the white area, and adjust the black circle in the color wheel
so that the a and b components are very close to 0 - this means that
the color is a shade of gray (between pure black and pure white).
In the Lab color space, positive a is red, negative a is green,
positive b is yellow, negative b is blue.
In the sample at right, a=2 and b=-5 - a pale reddish-blue.
If there is a white area that is too small to accurately locate
in the HP Preview window, then I do a similar adjustment in Photoshop (see below).
If the image is underexposed, I sometimes use the Exposure tool.
I feel it is better to adjust dark areas with the HP software because
it uses the full 12-bits of color data, and Photoshop only gets 8 bits.
The same argument also applies to coarse color correction.
Color Correction in Photoshop 3.0.4
 Photoshop is able to work with the full-size image,
and I use it for fine-tuning the color.
I use the Color Balance and Info box
(analogous to the Color wheel and Histogram in the HP software).
Usually I select a white object and Highlights
(not Midtones as in the image).
Getting a pleasing image is very subjective at this point.
Photoshop is able to work with the full-size image,
and I use it for fine-tuning the color.
I use the Color Balance and Info box
(analogous to the Color wheel and Histogram in the HP software).
Usually I select a white object and Highlights
(not Midtones as in the image).
Getting a pleasing image is very subjective at this point.
 After the Color Balance looks good, I often think the colors are too pale,
so I give them a boost with the Hue/Saturation tool.
After the Color Balance looks good, I often think the colors are too pale,
so I give them a boost with the Hue/Saturation tool.
Glenn Davis, 2000